N8n with Ollama on Kubernetes
Chris Cowley
- 13 minutes read - 2727 wordsOnce again I have a new tool I have been playing with, once again AI related. One of the tools I have been using is n8n which is a workflow automation platform. It enables us to integrate multiple applications and services through a visual interface. While it is very much an enterprise solution, it is FLOSS and we can deploy it at home, albeit with some caveats and/or workarounds.
One of the really powerful parts of N8n is that we can integrate with various AI platforms, including all the usual suspects: Claude, ChatGPT, etc. Of course I want to keep things local, which N8n caters for with Ollama.
My initial plan is to do react to an alert from Prometheus and give myself some advise about what to do. The plan is pretty simple and adds to my existing Alerts through Telegram:
Alertmanager
  ├─► Telegram (existing)
  └─► n8n webhook
        └─ Python Code (build prompt)
              └─ HTTP Request → Ollama
                    └─ Telegram (post analysis)
- Alertmanager fires a webhook to n8n alongside the existing Telegram notification
- n8n builds a prompt from the alert payload and sends it to Ollama
- Ollama analyses the alert and suggests a fix
- n8n posts the analysis back to Telegram
So let’s start by getting it installed
Installing n8n on Kubernetes
There is no official Helm chart, but the community-maintained chart is excellent and well maintained. To get started we need:
- Redis which we will install with Helm
- PostgreSQL for which we will use Cloudnative-PG
- Some storage (I will use Longhorn as usual)
- n8n itself
Dependencies first
Before we can do anything else, let’s get Redis and PostgreSQL setup. The simplest is Redis using the Cloud Pirates Helm Chart:
helm --namespace n8n install n8n-redis \
  oci://registry-1.docker.io/cloudpirates/redis \
  -f redis-values.yaml
The contents of redis-values.yaml is very simple:
architecture: standalone
master:
  persistence:
    enabled: true
auth:
  enabled: true
That will create a secret (n8n-redis) to we use later.
Info
Cloudpirates? Bitnami have been the go-to for this sort of thing for years, but they locked down all their helm charts. Cloudpirates have started re-creating what Bitnami were doing, but are community lead. Their work is from complete, but they have started.
Next up we can create a PostgreSQL cluster. I am using Cloudnative-PG for a couple of reasons:
- I like it
- I already have it in my cluster for Immich
- It supports creating database clusters with a Vector indexes enabled
That last one is important later on when I start using n8n for RAG (Retrieval Augmented Generation), but we can shelf it for now.
For now, install the Cloudnative-PG operator if you have not already:
helm repo add cloudnative-pg https://cloudnative-pg.io/charts/
helm install my-cloudnative-pg cloudnative-pg/cloudnative-pg
Next you need to create a secret with the DB password:
POSTGRES_PASSWORD=$(openssl rand -base64 18) \
  kubectl -n n8n create secret generic n8n-postgres-credentials \
  --from-literal username=n8n \
  --from-literal password=${POSTGRES_PASSWORD} \
  --from-literal postgres-password=${POSTGRES_PASSWORD}
Why do we have the password twice? That is because CNPG will use password key and n8n will use the postgres-password key. Unfortunately both are hardwired for that. This is also the reason we cannot simply rely on CNPG generating a secret and collecting that from n8n.
Once that is installed you can create a PostgreSQL cluster from the following db.yaml:
---
apiVersion: postgresql.cnpg.io/v1
kind: Cluster
metadata:
  name: n8n-postgres
spec:
  instances: 3
  imageName: ghcr.io/cloudnative-pg/postgresql:18
  storage:
    size: 5Gi
    storageClass: longhorn-local
  affinity:
    enablePodAntiAffinity: true
    topologyKey: kubernetes.io/hostname
    podAntiAffinityType: preferred

  bootstrap:
    initdb:
      database: n8n
      owner: n8n                          # creates the DB owned by this role
      secret:
        name: n8n-postgres-credentials    # used for the initial owner password

  managed:
    roles:
      - name: n8n
        ensure: present
        login: true
        superuser: false
        createdb: true
        passwordSecret:
          name: n8n-postgres-credentials  # CNPG reads the `password` key from here

  monitoring:
    enablePodMonitor: true # Enable the PodMonitor for Prometheus
    tls:
      enabled: false # Set to true if TLS is enabled for metrics
Here we create do a few things:
- Create a 3 node cluster
- Use non-replicated, local storage
- push each pod to a different node
- Create the n8n DB using the previously created n8n-postgres-credentials
- Monitor it with Prometheus
Apply that with kubectl -n n8n apply -f db.yaml and we are ready to install n8n itself.
Install n8n
The values I use for my initial install (we will be making some changes later) are the following:
db:
  type: postgresdb

externalPostgresql:
  existingSecret: n8n-postgres-credentials
  host: n8n-postgres-rw
  username: n8n
  database: n8n

externalRedis:
  host: n8n-redis
  existingSecret: n8n-redis

main:
  extraEnvVars:
    N8N_HOST: "n8n.example.com"
    N8N_PROTOCOL: "https"
    WEBHOOK_URL: "https://n8n.example.com/"
    N8N_WEBHOOK_URL: "https://n8n.example.com/"
  resources:
    requests:
      memory: 128Mi
    limits:
      memory: 1Gi
  persistence:
    enabled: true
    size: 8Gi
    storageClass: longhorn
    accessMode: ReadWriteOnce

worker:
  mode: queue
  extraEnvVars:
    N8N_HOST: "n8n.example.com"
    N8N_PROTOCOL: "https"
    WEBHOOK_URL: "https://n8n.example.com/"
    N8N_WEBHOOK_URL: "https://n8n.example.com/"
  count: 1
  resources:
    requests:
      memory: 256Mi
    limits:
      memory: 2Gi
  persistence:
    enabled: true
    size: 5G
    storageClass: longhorn
    accessMode: ReadWriteMany
  waitMainNodeReady:
    enabled: false

webhook:
  mode: queue
  count: 1
  url: "https://n8n.example.com"
  waitMainNodeReady:
    enabled: false

ingress:
  enabled: true
  className: nginx
  annotations:
    kubernetes.io/ingress.class: nginx
    cert-manager.io/cluster-issuer: letsencrypt
  hosts:
    - host: n8n.example.com
      paths:
        - path: /
          pathType: Prefix
  tls:
    - secretName: n8n-tls
      hosts:
        - n8n.example.com
Now there is quite a bit going on here, so let’s start by explaining the architecture. This will create 3 deployments (a single pod each in my case):
- Main node which coordinates everything.
- Worker node which is where things run. We will be coming back to this in more detail later.
- Webhook node is where external services will make requests to.
Most of the environment variables you see above are linked to the webhooks and it is not the best documented in the world.
The first 3 blocks are linking us to the previously created Postgres and Redis services. This is why we need the password twice in the secret, as externalPostgresql.existingSecret is hardcoded to use postgres-password.
Other than the envvars for the webhook, we also set some resource limits. I have not really analysed what is going on yet, but these were what Claude suggested and they are working for me so far. The final part of main is the storage, for which I use Longhorn. I have no intention of scaling this, so ReadWriteOnce is fine.
Once we have the main node configured, we can move on to the worker node(s). Here we set the mode to queue, which is what enables to separate out worker and webhook nodes by putting the jobs queue in Redis. We also have a repeat of the webhook environment varialbles. I also set the count to 1 and use the storage in ReadWriteMany mode. This is the only part I can see scaling at some point, so I wanted to make sure I could. The Helm supports autoscaling, so we will see.
The webhook section is, for now, the much simpler. This can be autoscaled, but I will keep it a 1 for now (and most likely forever) and once again we have to define our URL. Like with the worker node we also tell it not wait for the main node as I don’t see the point in that.
Finally we set up out ingress. To my shame, I am still on using Nginx, but I’ll be switching over to Contour soon. That should just be case of changing ingress.className. There is nothing surprising here, it a simple Ingress using Cert-Manager for TLS.blocks
Install that using Helm:
helm repo add community-charts https://community-charts.github.io/helm-charts
helm install n8n community-charts/n8n \
  --namespace n8n \
  --values n8n-values.yaml
Our workflow
Now you can log in to n8n and start the interesting stuff. The first thing to do is add our Ollama server, which in my case is in the ollama namespace of the same cluster (accessible on http://ollama.ollama:11434):
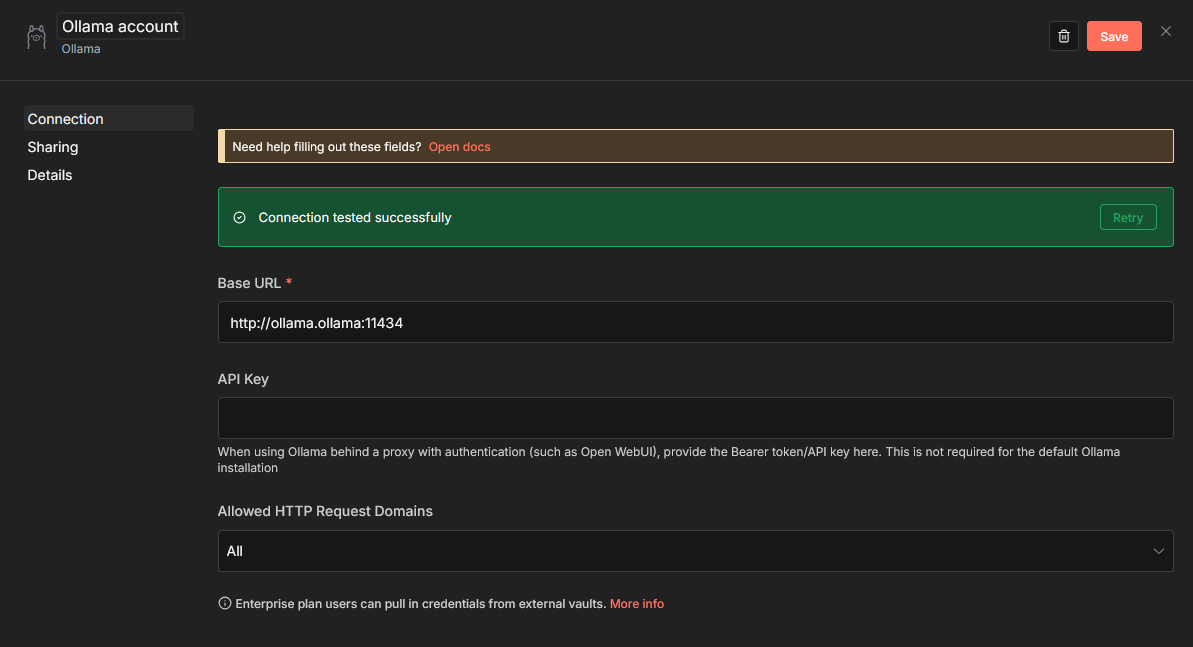
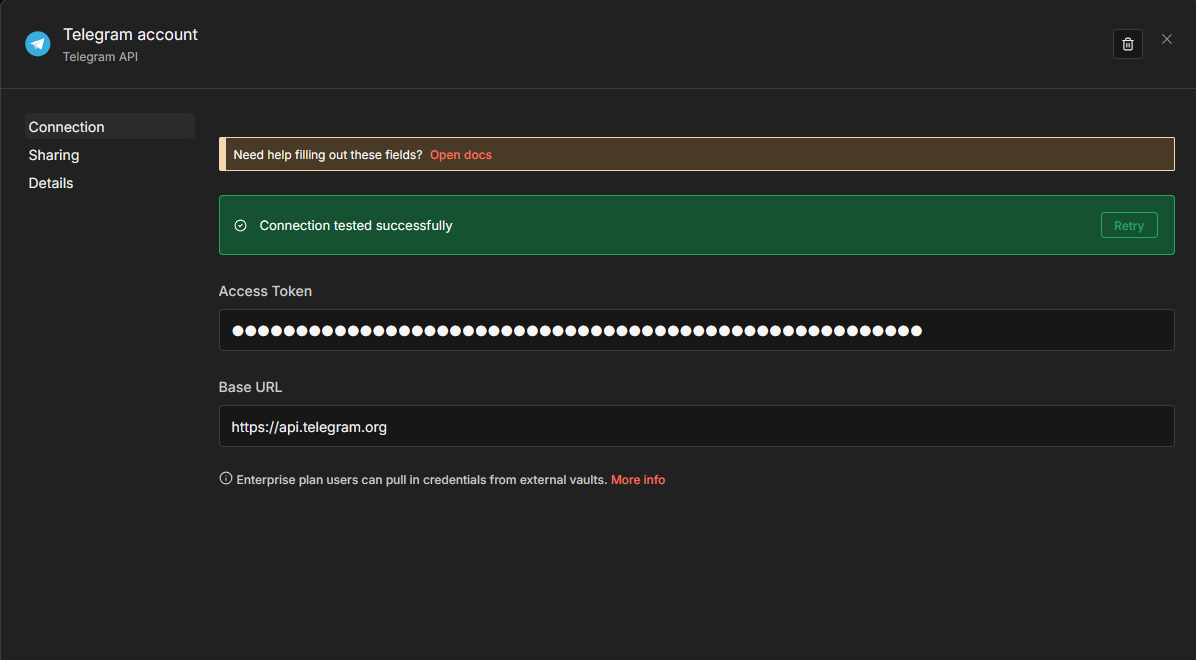
We also need to add a Telegram account credentials, for which you need an API Token.
Now we can create our workflow which is actually quite short:
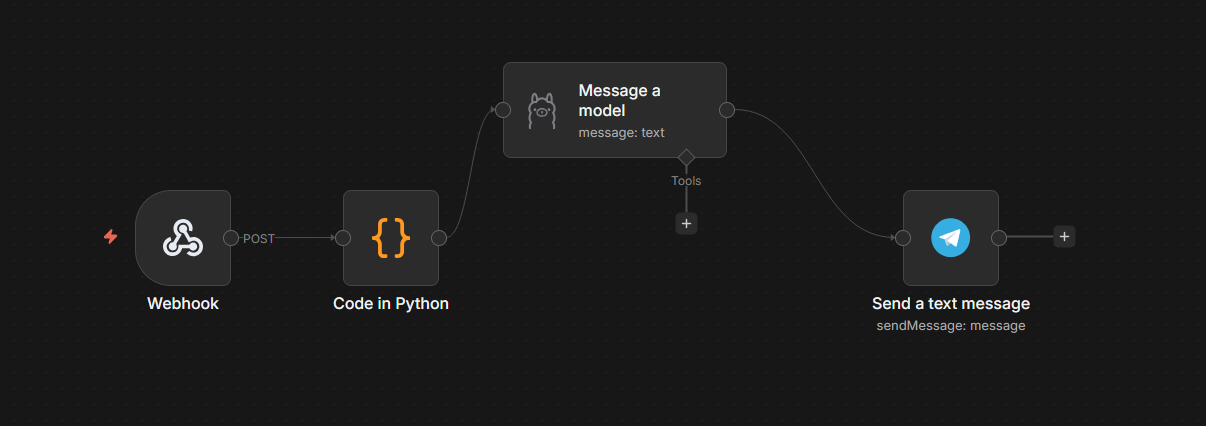
The workflow is the following:
- The Trigger is a Webhook, which outputs to
- A Code block to take the incoming Prometheus alert message and create a prompt. This prompt is then output to
- An Ollama “Message a model” block which takes that prompt, analyses it and makes some suggestions for what to do about it, which are then sent to
- A Telegram “Send a text message” block to send me the suggestions
Now we can dig into each of the individual nodes.
Webhook
The first step is to add our Webhook trigger, which will set up like this:
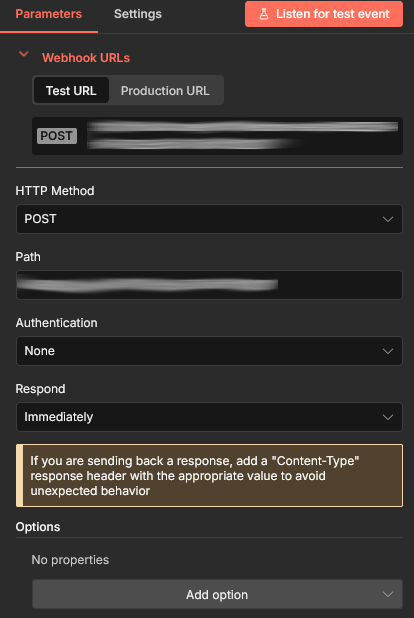
That also gives you the URL that you will add later to Prometheus; there will both a test and production URL. You may also want to add a Response Code of 200 under options. The main thing here though is to set your HTTP Method to POST as that is what Prometheus will be using.
What is not shown here, because I added it after taking the screenshot, is that I have enabled “Basic Auth”. Select it from the drop down, it will ask you to create new credential, give it a name and enter a long random string for the password (openssl rand -base64 24 will create something suitable) and a username (I use prometheus). Weirdly I initially wanted to use Bearer Auth, but that did not work. The n8n webhook adamantly wanted Basic Auth, even though Header Auth was selected. I decided it would be easier not to fight it and switched to Basic Auth.
Create a secret for Prometheus with that token:
kubectl -n monitoring create secret generic n8n-prometheus-webhook-secret \
  --from-literal password=<your-token-here> \
  --from-literal username=prometheus
We will be referencing that later when we configure Alertmanager
Code
The first interesting node is this one, in fact this what took most of the work.
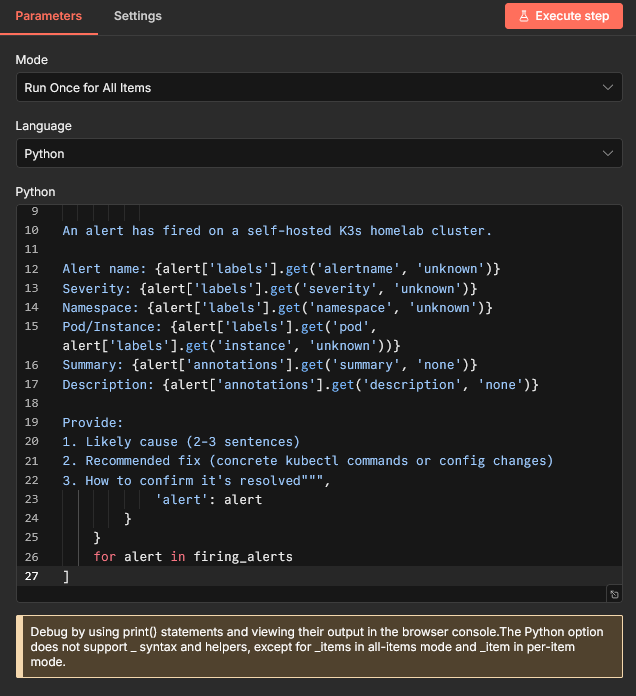
The full code there: is:
alerts = _items[0]['json']['body']['alerts']

firing_alerts = [a for a in alerts if a['status'] == 'firing']

return [
    {
        'json': {
            'prompt': f"""You are a Kubernetes operations assistant.

An alert has fired on a self-hosted K3s homelab cluster.

Alert name: {alert['labels'].get('alertname', 'unknown')}
Severity: {alert['labels'].get('severity', 'unknown')}
Namespace: {alert['labels'].get('namespace', 'unknown')}
Pod/Instance: {alert['labels'].get('pod', alert['labels'].get('instance', 'unknown'))}
Summary: {alert['annotations'].get('summary', 'none')}
Description: {alert['annotations'].get('description', 'none')}

Provide:
1. Likely cause (2-3 sentences)
2. Recommended fix (concrete kubectl commands or config changes)
3. How to confirm it's resolved""",
            'alert': alert
        }
    }
    for alert in firing_alerts
]
As you can see, this takes the message sent from Prometheus and returns a JSON document of with the prompt that will be sent to our LLM.
We will be returning to this in a bit, but for now let’s get our workflow finished.
Message a model
The Code block output to an Ollama “Message a model” node:
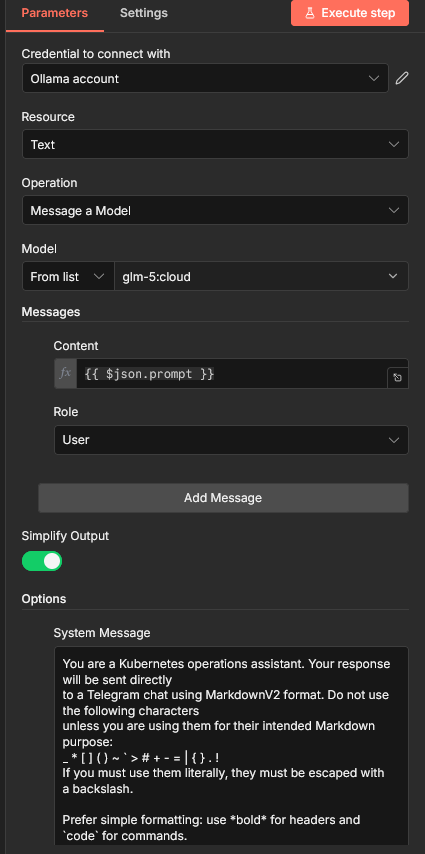
Start by choosing the Ollama credentials you added earlier. It will automagically get all the models that are available on your Ollama instance. Here I am using glm-5:cloud at the moment I took the screenshot, which actually runs on ollama.com. Something like Deepseek-R1, Qwen or even LLama work are fully self-hosted and also work incredibly well.
Make sure you content field is {{ $json.prompt so that the prompt you built gets passed to the LLM.
Finally, I had to add a System Message:
You are a Kubernetes operations assistant. Your response will be sent directly to a Telegram chat using MarkdownV2 format. Do not use the following characters unless you are using them for their intended Markdown purpose: _ * [ ] ( ) ~ ` > # + - = | { } . ! If you must use them literally, they must be escaped with a backslash.
Prefer simple formatting: use bold for headers and
codefor commands.
This is because Telegram’s markdown formatter is a little odd. That prompt is making the LLM aware that it will be outputting to Telegram and making sure it follows the necessary rules.
Telegram
The final part of our workflow is to actually send the message using Telegram.
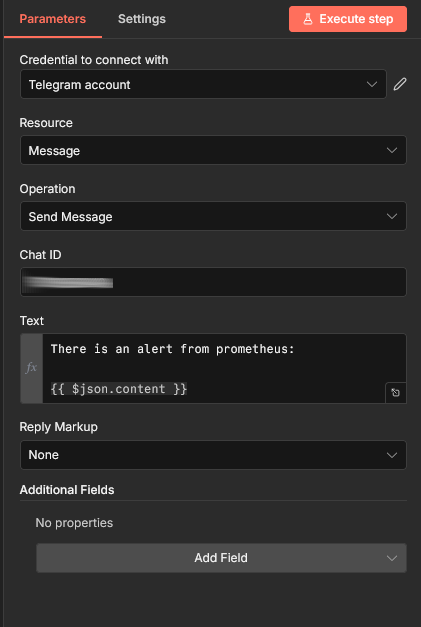
Choose the Telegram credentials you added earlier and add at least {{ json.content }} to the Text box. You also need to add the Chat ID that you will be sending too, I covered that in a previous post.
That is everything we need in our workflow, so you should be able to click Execute Workflow and it should work? Right? No, it will not work. If you run your workflow it will say:
Python runner unavailable: Python 3 is missing from this system Internal mode is intended only for debugging. For production, deploy in external mode: https://docs.n8n.io/hosting/configuration/task-runners/#setting-up-external-mode
Getting Python working
The error message above is telling us (in a weird way) that we need to use what are called External Runners, which n8n and its Helm chart consider an Enterprise feature. What is actually the case is that all we need to do is add a sidecar container to our worker node that will run n8nio/runners container.
This step took a huge amount of work and I went back and forth on multiple solutions. To do this we will be diving back into the n8n-values.yaml we used to install n8n.
The sidecar container need to authenticate to the main worker using an AUTH_TOKEN, so let’s start with that:
kubectl -n n8n create secret generic n8n-runner-token \
  --from-literal N8N_RUNNERS_AUTH_TOKEN=$(openssl rand -base64 18)
Now let’s add our sidecar containers and everything we need for them to work. All this goes in the n8n-values.yaml. I will try and be clear where things need to go, but you can refer to mine if you get lost.
Start with the following in main:
main:
...
  extraSecretNamesForEnvFrom:
    - n8n-runner-token
  extraContainers:
    - name: n8n-runners
      image: n8nio/runners:latest
      command: ["/usr/local/bin/task-runner-launcher", "python"]
      env:
        - name: N8N_RUNNERS_AUTH_TOKEN
          valueFrom:
            secretKeyRef:
              name: n8n-runner-token
              key: N8N_RUNNERS_AUTH_TOKEN
        - name: N8N_RUNNERS_TASK_BROKER_URI
          value: "http://localhost:5679"
Next, add the same thing to worker:
worker:
...
  extraSecretNamesForEnvFrom:
    - n8n-runner-token
  extraContainers:
    - name: n8n-runners
      image: n8nio/runners:latest
      command: ["/usr/local/bin/task-runner-launcher", "python"]
      env:
        - name: N8N_RUNNERS_AUTH_TOKEN
          valueFrom:
            secretKeyRef:
              name: n8n-runner-token
              key: N8N_RUNNERS_AUTH_TOKEN
        - name: N8N_RUNNERS_TASK_BROKER_URI
          value: "http://localhost:5679"
Finally, we need to add one last block:
nodes:
  external:
    allowAll: true
    packages:
      - "[email protected]"
Now let’s apply those changes:
helm update n8n \
  --namespace n8n \
  --values n8n-values.yaml
Once that has been applied, you will still have the same number of Pods, but the worker pods will now have 2 containers.
Prometheus
We will build on the Prometheus config from previously. We created an AlertmanagerConfig to send alerts to Telegram, so we will tag on to that and add a route to send to a generic webhook.
apiVersion: monitoring.coreos.com/v1alpha1
kind: AlertmanagerConfig
metadata:
  name: alert-routing
  namespace: prometheus
  labels:
    release: prometheus # the release label should be the exact label of the prometheus helm release label
    alertmanagerConfig: alertmanager-routing # custom label and also set this label to alertmanager in the prometheus-stack values.yaml
spec:
  route:
  ...
    - receiver: n8n
      continue: true
      matchers:
        - name: severity
          matchType: "=~"
          value: "warning|critical"
  receivers:
  ...
    - name: n8n
      webhookConfigs:
        - url: <url
          sendResolved: true
          httpConfig:
            basicAuth:
              username:
                name: n8n-prometheus-webhook-secret
                key: username
              password:
                name: n8n-prometheus-webhook-secret
                key: password
Now you can go back to n8n and hit Execute Workflow. Instead of waiting for Prometheus to send an alert (which will never happen, because my cluster is perfectly configured /s), we will replicate Alertmanager using httpie:
http POST <your-webhook-url> \
  --auth prometheus:<your-password-here \
  Content-Type:application/json \
  version="4" \
  groupKey='{}:{alertname="KubePodCrashLooping"}' \
  status="firing" \
  receiver="n8n" \
  groupLabels:='{"alertname": "KubePodCrashLooping"}' \
  commonLabels:='{"alertname": "KubePodCrashLooping", "severity": "critical", "namespace": "prometheus", "pod": "thanos-compact-0"}' \
  commonAnnotations:='{"summary": "Pod is crash looping", "description": "Pod thanos-compact-0 in namespace prometheus is restarting 5 times / 10 minutes."}' \
  externalURL="https://alertmanager.lab.cowley.tech" \
  alerts:='[{"status": "firing", "labels": {"alertname": "KubePodCrashLooping", "severity": "critical", "namespace": "prometheus", "pod": "thanos-compact-0"}, "annotations": {"summary": "Pod is crash looping", "description": "Pod thanos-compact-0 in namespace prometheus is restarting 5 times / 10 minutes."}, "startsAt": "2026-03-09T10:00:00Z", "endsAt": "0001-01-01T00:00:00Z", "generatorURL": "https://prometheus.lab.cowley.tech/graph?g0.expr=kube_pod_container_status_restarts_total"}]'
That ridiculous command will return:
HTTP/1.1 200 OK
Connection: keep-alive
Content-Length: 34
Content-Security-Policy: sandbox allow-downloads allow-forms allow-modals allow-orientation-lock allow-pointer-lock allow-popups allow-presentation allow-scripts allow-top-navigation allow-top-navigation-by-user-activation allow-top-navigation-to-custom-protocols
Content-Type: application/json; charset=utf-8
Date: Tue, 10 Mar 2026 17:04:47 GMT
ETag: W/"22-6OS7cK0FzqnV2NeDHdOSGS1bVUs"
Strict-Transport-Security: max-age=31536000; includeSubDomains
Vary: Accept-Encoding

{
    "message": "Workflow was started"
}
Your pipeline will launch and you should receive a nice message in Telegram with some idea on how to debug your (possibly non-existent) Thanos Compactor pod crashing. If so, you can change the url in Prometheus to be the production url and hit Publish.
Conclusion

There was a lot going on there. We have got n8n running (and executing Python scripts against its will) and doing something genuinely useful.
I have barely scratched the surface of what I can do with n8n. As I said at the beginning, it is a “platform” not an application. This thing is certainly not batteries-included, but I am really enjoying what I see here.
Hopefully this is useful for someone else too.